Open topic with navigation
Power Measurements Using MultiList Display
Creating the MultiList Display
-
From the Display 1 or Display 2 tab, click the MultiList  button to create a new display view. Only one MultiList display view can be added per Power Meter application.
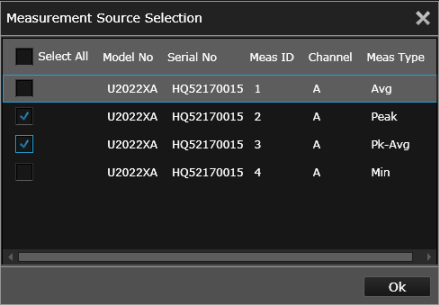
- The "Measurement Source Selection" dialog is then displayed. Select one or more available measurements from the list of connected instruments and click OK to proceed. [Resize: 90%]
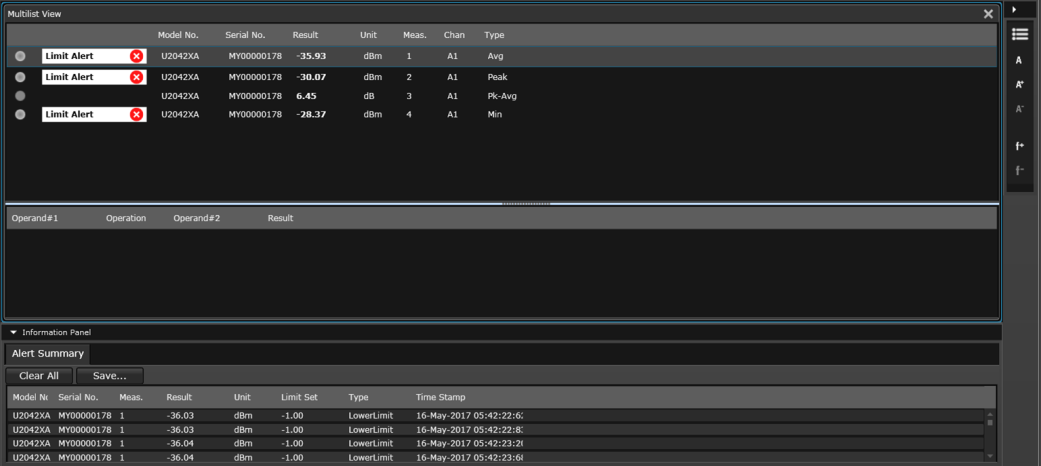
- The MultiList display view is created with the assigned measurements displayed in a tabular format. To edit the measurements currently assigned to this view, click the Assign Measurement
 button (near the top of the Display tab) and select the desired measurements.
- Display the limit alert when the following conditions are met:
- Enable Alert checkbox is checked
- The corresponding measurement in the Multilist is out of the range specified by the upper or/and lower limits.
Display Options
On the right side of the current display view, a Tools Palette provides controls for the following display options.

|
Change the title at the top of the current display view. |

|
Reset the size of the displayed font for the MultiList view to its default value. |

|
Increase the size of the displayed font for the MultiList view. You can change the font size when measurements are running or stopped. |

|
Decrease the size of the displayed font for the MultiList view. You can change the font size when measurements are running or stopped. |

|
Add a mathematical operation to measurements in the current view. You can choose to assign more than one operation to the current view. |

|
Remove the selected mathematical operation from the current list. |
Adding Mathematical Operations
To add a mathematical operation to measurements in the current view, click  to open the "Math Builder" dialog. You can choose to assign more than one operation to the current view.
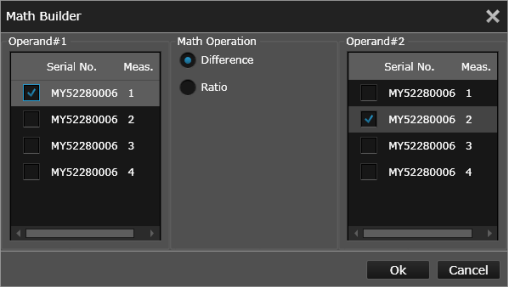
The following math operations are available:
- Difference - Enable the difference operation between Operand 1 and Operand 2 (Operand 1 - Operand 2).
- Ratio - Enable the ratio operation between Operand 1 and Operand 2 (Operand 1 ÷ Operand 2).
To remove an existing mathematical operation, select the desired operation from the list and click  .
.
Capturing Power Measurements Using MultiList Display
- Before capturing power measurements, you will need to configure your measurements from the Instrument Setup tab. If you have multiple Power Meters connected to this bench application, be sure to configure each instrument from the "Additional Instruments" panel on the left side of the Instrument Setup tab. For more information, see Connecting Additional Instruments.
Note: A subset of the commonly used measurement parameters is also available from the Settings tab located on the Display tab. See the "Calibration", "Channel Setup", "Measurement", and "Trigger Setup" drop-down panes to edit those measurement parameters.
- To start the measurement acquisition for this view, click the
 button next to the "Measurement" properties drop-down pane. Measurements and operations will be displayed in real time. To stop the measurement acquisition for this view, click the
  button next to the "Measurement" properties drop-down pane.
- To start all assigned measurements on all display views simultaneously, click the
 button located at the bottom of the Settings tab. Measurements and operations will be displayed in real time. To stop all assigned measurements on all display views simultaneously, click the
  button located at the bottom of the Settings tab.
Information Panel Drop-Down
As shown in the screen capture above, an Information Panel drop-down is provided under the current display view. This panel summarizes important measurement information for the current display view.
For the MultiList view, the Information Panel provides a summary of Alert Limit conditions for the current measurement. For more information, see Set Measurement Alert Limits.
See Also
MultiList Display Summary